Render Helper Tools#
These Render Helper Tools facilitate the creation of simple sketches.
Currently this is limited to the default and OpenGL renderers (P2D and P3D). Support for other renderers such as SVG will be added in the future.
All of the tools documented on this page work outside of Jupyter Notebooks, but it is here they are the most useful.
from IPython.display import display

import py5
Making a Single Image#
Below is an introductory example showing how to make a single image.
The first parameter, s: py5.Sketch, includes a typehint. The typehint makes tab completion provide the right fields and methods, simplifying development.
def draw_square(s: py5.Sketch):
    s.background(240)
    s.rect_mode(s.CENTER)
    s.fill(255, 0, 0)
    s.rect(s.width / 2, s.height / 2, 50, 50)
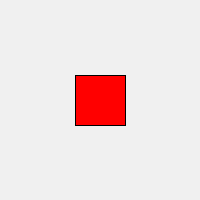
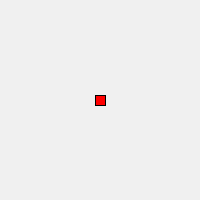
Pass the newly created draw_square function to render_frame(). It will render a single frame sketch with a width and height of 200, 200. The result is returned as a PIL Image object.
img = py5.render_frame(draw_square, 200, 200)

print(type(img))
<class 'PIL.Image.Image'>
Here’s what that image looks like:
img
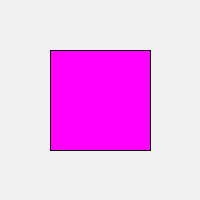
Next, add some parameters to draw_square to parameterize the output.
def draw_square(s: py5.Sketch, fill_color, square_size):
    s.background(240)
    s.rect_mode(s.CENTER)
    s.fill(*fill_color)
    s.rect(s.width / 2, s.height / 2, square_size, square_size)
Below, use the new draw_square function with render_frame(). Arguments are passed to draw_square via render_frame()’s draw_kwargs parameter.
You can pass positional arguments with draw_args but using keyword arguments is easier and more readable.
img = py5.render_frame(draw_square, 200, 200,
                       draw_kwargs=dict(fill_color=(255, 0, 255), square_size=100))

img
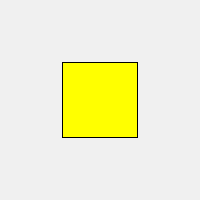
@render is the decorator equivalent for render_frame(). This achieves cleaner results, particularly when passing function arguments.
When using decorators, don’t forget to type that @ sign at the beginning. If you forget, it won’t work correctly.
@py5.render(200, 200)
def draw_square(s: py5.Sketch, fill_color, square_size):
    s.background(240)
    s.rect_mode(s.CENTER)
    s.fill(*fill_color)
    s.rect(s.width / 2, s.height / 2, square_size, square_size)
Now you have an easy to use function that outputs images using the passed parameter values.
draw_square((255, 255, 0), 75)
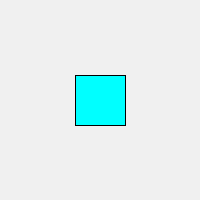
You can make this more interesting with default arguments and the OpenGL renderer.
@py5.render(200, 200, py5.P2D)
def draw_square(s: py5.Sketch, fill_color, square_size=50):
    s.background(240)
    s.rect_mode(s.CENTER)
    s.fill(*fill_color)
    s.rect(s.width / 2, s.height / 2, square_size, square_size)
img1 = draw_square((0, 255, 255))
img2 = draw_square((255, 0, 0), square_size=10)

display(img1, img2)
Finally, apply what you’ve learned to make a more interesting example.
@py5.render(400, 100)
def draw_message(s: py5.Sketch, message, color=(255,)):
    s.background(0)
    s.text_size(40)
    s.text_align(s.CENTER, s.CENTER)
    s.fill(*color)
    s.text(message, s.width / 2, s.height / 2)
msg1 = draw_message('py5')
msg2 = draw_message('is')
msg3 = draw_message('awesome!', color=(255, 0, 0))

display(msg1, msg2, msg3)


Assembling that into an animated GIF is easy with the PIL Image library.
!mkdir -p images/render_helper/

msg1.save('images/render_helper/py5_is_awesome.gif',
          save_all=True, duration=500, loop=0, append_images=[msg2, msg3])
Here is the animated GIF:

Making a Series of Images#
The Render Helper Tools can also create a sequence of images for an animation of some kind.
def draw_cubes(s: py5.Sketch, cube_size=50):
    s.background(255)
    s.no_fill()
    s.translate(s.width / 2, s.height / 2, 50)
    s.rotate_y(s.HALF_PI * s.frame_count / 10)
    s.box(cube_size)
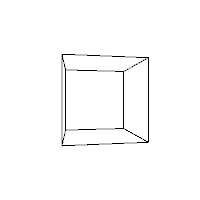
Pass the draw_cubes function to render_frame_sequence() to return a list of PIL Image object.
cubes = py5.render_frame_sequence(draw_cubes, 200, 200, py5.P3D, limit=10)

cubes
[<PIL.Image.Image image mode=RGB size=200x200>,
 <PIL.Image.Image image mode=RGB size=200x200>,
 <PIL.Image.Image image mode=RGB size=200x200>,
 <PIL.Image.Image image mode=RGB size=200x200>,
 <PIL.Image.Image image mode=RGB size=200x200>,
 <PIL.Image.Image image mode=RGB size=200x200>,
 <PIL.Image.Image image mode=RGB size=200x200>,
 <PIL.Image.Image image mode=RGB size=200x200>,
 <PIL.Image.Image image mode=RGB size=200x200>,
 <PIL.Image.Image image mode=RGB size=200x200>]
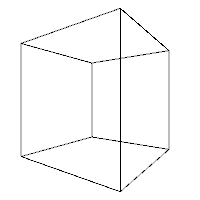
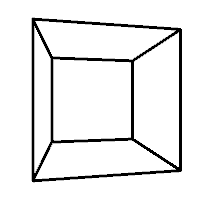
display(cubes[0], cubes[5])
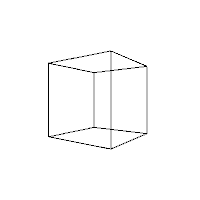
As before, a decorator is available. @render_sequence is the decorator equivalent of render_frame_sequence().
@py5.render_sequence(200, 200, py5.P3D, limit=10)
def draw_cubes(s: py5.Sketch, cube_size=50):
    s.no_fill()
    s.background(255)
    s.translate(s.width / 2, s.height / 2, 50)
    s.rotate_y(s.HALF_PI * s.frame_count / 10)
    s.box(cube_size)
cubes = draw_cubes(75)

display(cubes[0], cubes[5])
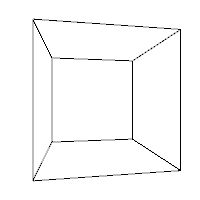
Normally py5 sketches have a setup() method that is run once at the beginning of the animation. This method might be used to configure fill and stroke settings that should apply for every frame of the animation. You could leave those kinds of commands in the draw_cubes() function, but it might be nice to be able to break it out into a seperate cube_setup() function, like so:
def cube_setup(s: py5.Sketch):
    s.no_fill()
    s.stroke_weight(3)

@py5.render_sequence(200, 200, py5.P3D, limit=10, setup=cube_setup)
def draw_cubes(s: py5.Sketch, cube_size=50):
    s.background(255)
    s.translate(s.width / 2, s.height / 2, 50)
    s.rotate_y(s.HALF_PI * s.frame_count / 10)
    s.box(cube_size)
Now use the draw_cubes function and create an animated GIF.
cubes = draw_cubes(75)

first_cube = cubes[0]
first_cube.save('images/render_helper/rotating_cube.gif',
                save_all=True, duration=100, loop=0, append_images=cubes[1:])
Here is the GIF:

In the previous example the frame_count field was used to drive the animation, rotating the cube by a different angle in each frame. It worked well, but it might not always be easy or convenient to link changing animation state to frame_count. An alternative approach is to use the Python global keyword.
Below is the same example as before, but without depending on frame_count.
rot_y = 0

@py5.render_sequence(200, 200, py5.P3D, limit=10, setup=cube_setup)
def draw_cubes(s: py5.Sketch, cube_size=50):
    global rot_y
    s.background(255)
    s.translate(s.width / 2, s.height / 2, 50)
    # rot_y gets updated with each frame, changing the state
    rot_y += s.HALF_PI / 10
    s.rotate_y(rot_y)
    s.box(cube_size)
cubes = draw_cubes(75)
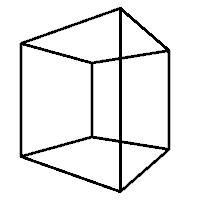
display(cubes[0], cubes[5])
A Caveat#
In both Processing and py5 it is unwise or impossible to run a sketch inside of another sketch.
These Render Helper Tools are creating and running sketches to provide their functionality. Although you might be tempted to do so, do not use them in any way that places them inside of another running sketch.