Animation and Sketch Portals#
This is a simple demonstration of using py5 in Jupyter notebooks. This will use the P3D (OpenGL) renderer. If you are running this notebook through binder, the running Sketch will be viewable through a py5 Sketch Portal. If you are viewing this page from the py5 documentation website, see the Binder or Live Code options by hovering your mouse over the rocket ship icon at the top of this page.
Import py5 and py5_tools#
Import the py5 library. When the library is imported the Java Virtual Machine (JVM) is started.
import py5_tools
import py5
Define Global Variables#
Define some global variables that will be used by the Sketch.
rot_x = 0
rot_y = 0
rot_z = 0
Define setup Method#
This will set the width and height of the Sketch, along with the frame rate and other basic setup type stuff.
py5 allows you to call the size() method from setup() and skip settings() altogether. This is analogous to what can be done in the Processing IDE.
def setup():
    py5.size(400, 400, py5.P3D)
    py5.frame_rate(30)
    py5.stroke_weight(8)
    py5.stroke(0)
    py5.no_fill()
Define draw Method#
The draw method will do some transformations and draw a box.
def draw():
    py5.background(192)

    global rot_x
    rot_x += 0.8
    global rot_y
    rot_y += 0.3
    global rot_z
    rot_z += 0.5

    py5.translate(py5.width / 2, py5.height / 2, -200)
    py5.rotate_x(py5.radians(rot_x))
    py5.rotate_y(py5.radians(rot_y))
    py5.rotate_z(py5.radians(rot_z))

    py5.box(250)
Run the Sketch#
Run the sketch, opening a window on the display. If you are running this through a JupterHub platform such as binder, no window will appear on your computer because the Sketch is really running on a server in the cloud. As an alternative, we will create a py5 Sketch Portal to view the animation.
py5.run_sketch()
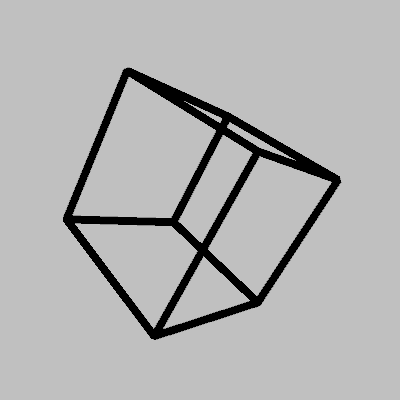
Here’s a screenshot, so readers of the static documentation website can understand what is happening:
py5_tools.screenshot()
Open the py5 Sketch Portal#
This will create a Sketch Portal and embed it in the notebook using py5_tools.sketch_portal().
Internally the portal uses a hook mechanism that allows you to insert code to be run before or after any py5 method. This hook mechanism will one day allow developers to create py5 libraries and extensions.
To be clear, although you will see a live animation in the Sketch Portal, the Sketch is not actually running in your browser. It’s kind of like when you watch a live television program on your TV. The live events are taking place somewhere else, but images of the events are being broadcast to your television.
portal = py5_tools.sketch_portal(quality=75, scale=1.0)

portal
You should see a clean and smooth animation. If you are running this through mybinder, the animation quality will be dependent on your having a good internet connection and a well behaved server. If it seems jumpy, try adjusting the quality or the scale. You can also try using the throttle_frame_rate parameter to lower the sketch portal’s frame to below the Sketch’s frame rate. See the documentation for more information.
Check the Sketch frame_rate#
Check the frame_rate. You should be able to get 30 frames per second for this Sketch. You might be able to get 60 frames per second while running on mybinder, but not all the time.
py5.get_frame_rate()
30.060470581054688
Next Steps for Jupyter Lab Users#
If you are using Jupyter Lab, after executing the Sketch Portal cell, try right clicking in the output area and selecting Create New View for Output. This will create a new panel just for the Sketch Portal. Creating a New Console for Notebook and creating a portal there works well also.